Jun
21

Modeling walls with the solidify modifier

By

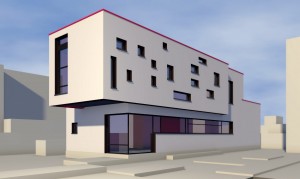
Last week I was doodling something to use solidify on, I didn’t go too far on details or materials and it came out like this:

generic-crop

When modelling for architectural visualisation in Blender you don’t want to miss the solidify tool. It is a precision tool and replaces for me the simple offset function any cad software has and Blender still lacks. I was happy to find it has been improved with the new Blender release and upgraded from the mesh menu to the modifiers panel with some extra useful settings.


How does it work: whether in edit or object mode, go to the modifiers panel -> solidify, then input needed thickness. The modifier also allows you to set different materials to the new faces and rims.

Things to check before “solidifying” so you get it right:

– all double vertices removed (edit mode)

– recalculate normals so they’re facing all same way (edit mode)

– apply scale in object mode if there has been any scale transformation

I am using it on all kinds of stuff: furniture parts, frames, window frames, lamps, pots, vases and so on.

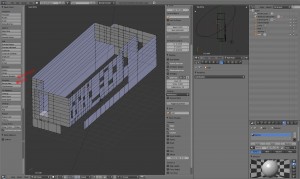
Still, the best use I found for it is modelling walls. Actually I wouldn’t model a building any other way now. I start with the exterior skin. It’s easier this way to cut any type of openings and construct the overall shape of the building. The walls can have all kind of shapes.

solid-skin

I can make this in one piece or maybe split it in several sections. I take care to have a very clean mesh with clean, well connected edges, no double vertices. When I make the openings I just detach those faces (P) and use them later for the glass panes.

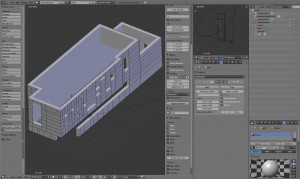
When my building skin looks right I use the modifier but I can still adjust things until everything is OK. For a more complex shape I need to check “even thickness” and “high quality normals” in the modifier’s panel to get even thickness on all faces.

solid-01

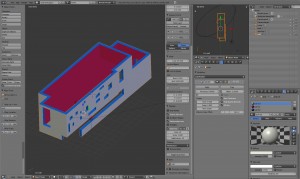
I also like to use  the new feature for assigning different materials to the new faces. It can be useful to have a different material on the inside, and I can also use this to model the windows.

solid-02

To do this I have to apply the modifier, so everything must be just right, further changes to the openings won’t be as easy to make with the thickness applied. Of course I can keep a backup of the model with modifier not applied.

solid-03-openings

I select the “rims” by material in edit mode, duplicate and detach them. From this I detach the top and base of the walls leaving just the faces around openings, move some vertices around in plan view and use solidify again to make all window frames in one hit. Sure, for more detail there will be some more editing but this method can prove a bit of a shortcut in many cases.

I edited the model a bit more so I can post a more complete image at the beginning of this post. I am not sure if I should go ahead and work on this piece for my next portfolio render or start over on something more inspiring, I’ll think about it until tomorrow 🙂

Happy blending!

  • Sfepa

    Nice tip! it is too late for me to use it in my current project. but i’ll remember it !)

  • Oana

    Thanks!

  • Carrozza

    Agreed, solidify modifier look like a big time-saver for architectural modeling.
    Cheers!

  • When you say “the new Blender release”, which version do you mean?

  • Oana

    Good point, I should mention Blender version. I used 2.58 for this. Did you have any trouble with it?

  • Mihai M.

    Doamne deci cat am cautat un site de genu’ asta.

    Sunt student la design si in proiectul meu actual trebuie sa folosesc modifier-ul de grosime. Am cautat pe google ” blender solidify modifier ” pentru ca vroiam sa ma lamuresc cum se foloseste si cand. Am mai facut tutoriale online si am vazut ca e foarte important cand si in ce ordine se folosesc aceste modifiere. Nu sunt sigur totusi ar fi mai bine sa fiu in object mode sau edit-mode cand il aplic.
    Trebuie sa mentionez ca am aplicat in object mode si nu prea pot sa ma misc foarte bine in jurul obiectului sau sa fac pan.
    PS: sper sa nu se supere nimeni ca scriu in romana !

  • Oana

    Buna Mihai 🙂 eu nu ma supar, dar daca scriem ceva interesant desigur ar fi mai bine in engleza pentru a fi de folos si altora 😉 Sper sa nu te superi daca voi continua si in engleza. Modifierul pare sa lucreze la fel in edit si solid mode. Se misca mai greu in sensul ca merge calculatorul mai greoi sau setarile de pan zoom nu functioneaza cum ai vrea? In user preferences -> input gasesti unele setari pentru zoom.

    The modifier seems to work the same in edit and object mode.

  • Mihai M.

    Indeed it seems to work the same in object or edit mode.
    I unchecked the rotate around selection in the user preferences. It seems to work better this way.

    You should do a post on the new re-mesh modifier once it gets into trunk 😉

  • Oana

    I have a slight notion about what it does but no idea if I have any use for it 🙂 Can you give me an example what would you use it for? I sometimes model things that are a bit more complex and organic than orthogonal walls.. but not too often 😉

  • alexandre guerra

    Really thanks for the tip

    If you know a way to perfom the mesh to scale preserving the thickness for the objects, it would be great

    this is what im looking to reproduce

    http://www.youtube.com/watch?v=dGvBr-qBS14

    The cabinet stretches preserving thickness and geometry

    will look further

  • Oana

    Hi, sorry for taking a long time to answer. I usually do that kind of scaling on furniture pieces in edit mode. Using the cabinet example in the video – I would select the right half vertices and move them, so the detail thickness stays the same. If you want to use solidify… all solidify sizes will be preserved as long as you don’t apply the modifier. In object mode, after scaling you must apply scale (ctrl A) to have the scaling not affect the modifier. Hope this helps.

  • Steppenwolf

    Am o intrebare legata de solidify. Nu prea are legatura cu arhitectura dar are legatura cu modifieru-l. Am modelat o rochie- am mapat-o (pentru a o textura) si acum vreau sa folosesc solidifier pe ea. Cum as putea sa folosesc solidifier, astfel incat shellurile noi identice generate sa se suprapuna.(sa nu texturez de 2 ori), iar marginile sa apara ca shell-uri noi? Uitati cum arata layout-ul dupa solidify… Practic aceleasi shelluri imi apar de 2 ori. http://blenderartists.org/forum/showthread.php?317511-Faster-way-to-layout-duplicate-UV-Shells-Islands .

  • It is in reality a great and helpful piece of info.
    I’m glad that you shared this helpful info with us. Please stay us up to date like this.
    Thank you for sharing.