Handling geometry and basic modelling in Blender 2.49
ByI have presented in a previous post the Blender interface. Now it’s time to do some Blender stuff. This is intended as a Blender beginner post so I will try to keep it simple yet cover several useful tools. I’ll remind you the online official user manual is also a good place to find basic information.
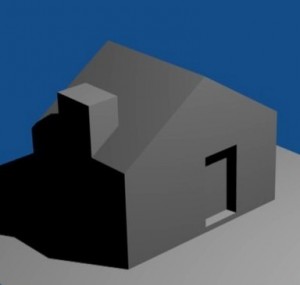
I will use a small simple object to demonstrate and as my primary interest is architectural modelling… how about a little house? 🙂
This is a post about modelling so right now we’ll settle for this dull grey (some architects might say sophisticated) render. We are not modelling something too fancy, it’s just a pretext to pass through some basic notions.
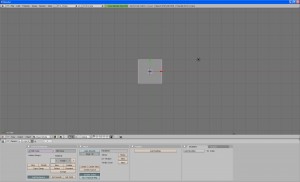
You can organise your Blender layout any way you like but I will use the standard layout, that is what you get when installing and opening the program for the first time. It looks like this, with a cube, a camera and a lamp already in the scene:
ZOOM, PAN AND CHANGING THE VIEW
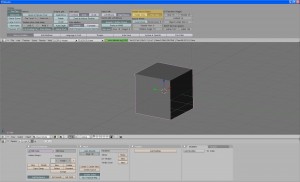
Our first need is to navigate the 3d window. The default options are zoom on the mouse wheel, pan with SHIFT+middle mouse button and MMB for rotating the view. For those used to panning with MMB like me, pull down the bottom margin of the top menu header and change the pan option in the view & controls tab of the Personal Settings Panel. Now SHIFT+MMB will rotate the view. Pull the Settings panel back out of sight. Now you can examine the scene a bit and you will notice the cube is shaded grey. Pressing Z key while keeping the mouse cursor over the 3d window will change the display to wireframe mode.
We can also change views using the numpad keys:
key 5 changes the mode from orthogonal to perspective
key 7 switches to top view (and ctrl+7 the opposite – from under)
key 1 switches to front (ctrl+1 back)
key 3 switches to side (ctrl+3 the other side)
key 0 changes to the active camera view
Note that keyboard commands apply to the active window and you activate a Blender window by just hovering the cursor over it, not clicking on it; so be careful where you leave your mouse when pressing keyboard shortcuts or you might get unexpected results. I choose to use the keyboard shortcuts, this is a very handy work method in Blender but you can also find the commands in the 3d window header. The menus also have detailed mouse over descriptions.
We have to start any kind of modelling from one of the basic primitives and I’ll use the cube already in the scene. You can start almost any Blender model from a cube… especially in architectural visualisation.
I will select the cube by Right Mouse Button clicking on it.
SELECTION TOOLS
We have many selection tools in Blender, but for this beginner job we just need to know RMB selects an object, SHIFT+RMB adds to the selection and A key selects all/none.
OUTLINER
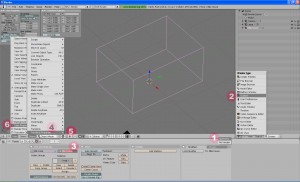
Let’s look at some ways to handle this cube. After we have selected it we can see it’s name in the lower left corner of the 3d window: not surprisingly, it’s “cube”. Let’s now add a new window that I find very useful especially in complex projects containing lots of objects. Click MMB on the boundary between the 3d window and the Buttons window and chose Split Area on the little menu that appears under the cursor (1). Move your mouse up, click and the 3d window will split in two. Change the window to Outliner from the drop-down list in the left side of the window header(2). This window has a tree listing of all the stuff in the project: objects, lights, cameras etc and it can be used to make selections and change such properties as visibility and renderability of the objects. We can see our “cube” in the Outliner.
BUTTONS WINDOW
Let’s now take a look at the bottom window, The Buttons Window. This is where most of the objects and scene properties can be handled and as we have our cube selected the window shows the cube’s properties. This window has something of a tab structure. To the right of the word “panels” we have a set of buttons that work like tabs, each revealing a different set of “panels” grouped for different kind of properties and tasks. For some of the “tabs” a second set of “tab buttons” appears to the right for more properties panels. We don’t have to go too deep for now, the default scene shows the “editing” button pressed, so the window shows some main editing options for the selected object, the cube. One thing I would like to do now is to change the cube name into something more suggestive. One place to do this is at the top left of the buttons window, where we see two editing fields that read “cube”. I will put “little house” in the OB (object) field (3). The other field “ME” is for something called Datablock, but I will cover that another time. We now see “little house” in the Outliner Window also.
TRANSFORM PROPERTIES WINDOW
Another useful place to handle our object and name it is the Transform Properties Window. This is a floating small window contained inside the 3d view window that can be opened either via the object menu in the 3d view window header (4) either by pressing the N key. Here we can see the default Blender cube – now the starting brick of our little house – has 2x2x2 Blender units and it’s center (shown as a pink dot) is located at the zero point of the coordinate system. I like my house to sit nicely on the zero plane so I will move the cube 1 blender unit up the z axis by entering 1 in the LocZ field. I always consider Blender units as meters and work exactly to scale but as this is a toy house I will not bother much with size, I will just alter the proportion a bit to get a pleasing little house. I could do this using the scale or dim fields in the transform properties window but let’s try scaling with the scale command and see how this works.
TRANSFORMATIONS
The scale and rotate commands need a scaling/rotating pivot. There are several points that can be used for this, the default is the median point of the selection. This can be changed from the drop down list in the 3d view window header (5). We’ll change it to “3D cursor”. The 3D cursor is the target like symbol in the 3d space and it is a helper, like a pin you can change to any coordinates of the 3d space and use it in different ways, as pivot for instance. The 3D cursor is placed initially at the 0,0,0 point and you can change it’s location by left mouse clicking or with precision in the View Properties Window (6). Shift-C moves the cursor back to point zero. We’ll make sure the cursor is at point zero and press S for scale, Z to constraint the movement to the Z axis, then 0.5 and Enter to reduce the cube height by half. Let’s do the same for the x axis: S, x, 0.7, Enter. You’ll notice the header of the 3d view window reflecting these operations. So you see it is easy to make precise transformations in Blender by entering numeric keyboard input.
I’ll just mention the other transformations for now: R for rotate and G for move (maybe from Grab?). Numeric input and axis constraints also work here. Another way to make these transformations is using the 3D transform manipulators (also in the 3d view window header) but I will not get into this now.
LOOPS
Next we’ll start changing the shape of our cube. The main tools that can add more complexity to our mesh are new loops and extrusions. A loop is kind of a cut through the object, subdividing the edges and faces it crosses and adding new mesh points. Loops divide meshes in a clean fashion and for architectural models this is the best way to go.
BOOLEANS?
You might miss the boolean operations (combining or subtracting solid objects from each other) from other software. The short story is: booleans don’t work well in Blender (as yet). More precisely, they can work sometimes but will generate triangular faces that can render bad or will be difficult to modify. The best thing is to have a model neatly divided in quadrangular faces according to the needs of the model – door openings and other elements. There are also ways of handling rounded openings without having to use boolean operations.
EDIT MODE
Like in other software you have used, Blender objects can be edited in object mode (as a whole) or in edit mode, accesing the mesh elements – vertices, edges and faces. Our cube was initially in Object mode. Change to Edit mode by pressing Tab or use the drop down list in the 3d window header. Then switch to any of the three editing modes – vertices, edge, face – with Ctrl-Tab or using the buttons at the right of the 3d view window. While in edit mode only the selected object is accesible, to work with another object or add a new one we have to get back in Object mode. Note that in Edit mode the menus and buttons in the 3d view window header are a bit different from those in Object Mode.
…SO BACK TO LOOPS
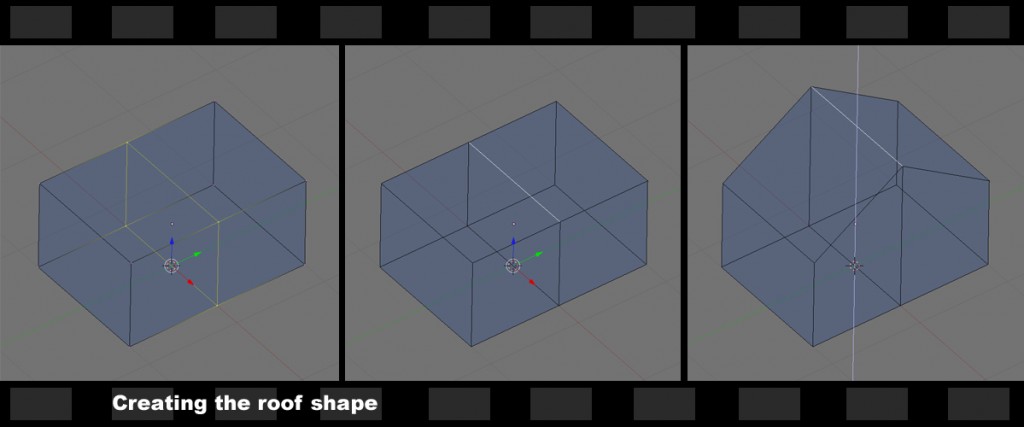
First we have to plan a bit our work. We need to divide the mesh as to create a median line for the roof, a rectangle for the door and another rectangle on the roof for the chimney.
To add a loop we have to be in Edit mode, in any of the three editing modes. Press Ctrl-R then move the mouse over the mesh. You will notice a loop appearing through the middle of the edges you are pointing to and changing position as you move the mouse to other edges. Choose a vertical loop to set the median line of the house, where our roof will be. Now the loop is inserted but it slides along the edges as we move the cursor. Clicking again will finish the operation and leave the loop where we placed it by moving the mouse, but to insert it exactly in the middle we’ll press the middle mouse button.
Let’s make the roof shape. Switch to edge editing and select with RMB the edge in the middle of the top face. The shortkey for moving is G (from grab?). Press G and then Z to constraint the movement to the Z axis. Move the edge up a bit and now we have our basic little house shape.
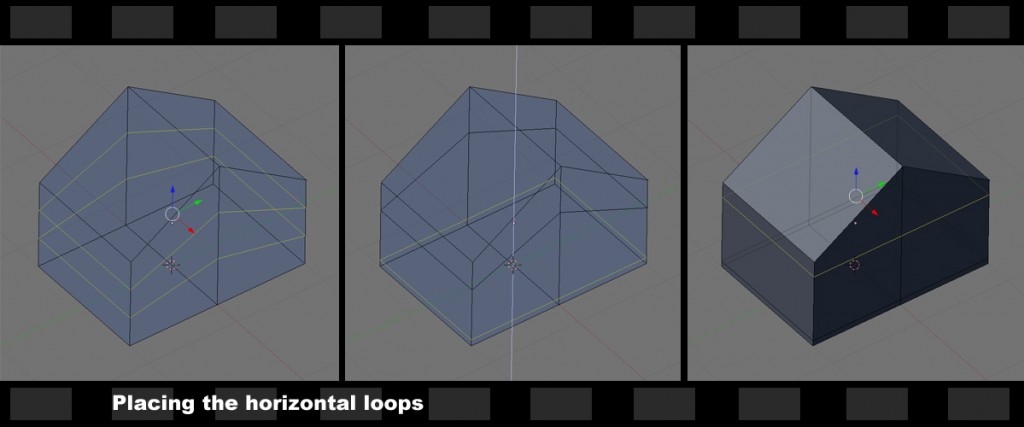
Now we’ll add some more loops to start creating the door and chimney. First press again Ctrl-R and move the mouse to one of the vertical edges to position two horizontal loops for the door. At this point, if you move the mouse wheel you’ll see the loop multiplying. Make it two loops and click to finish the operation. Oops. The loops are crooked, the edges have been proportionally divided and the loops follow the roof shape.We’ll have to straighten them. To select all edges in a loop, right mouse button click on it while pressing Alt key. Using S (scale) z (z constraint) and pressing zero will align all selected points on the xy plane. While we’re at it, we’ll adjust the position of the loops with G (move) on the z axis. You can see I have also changed to shaded mode (pressing z), I like the way objects are shaded in Edit mode.
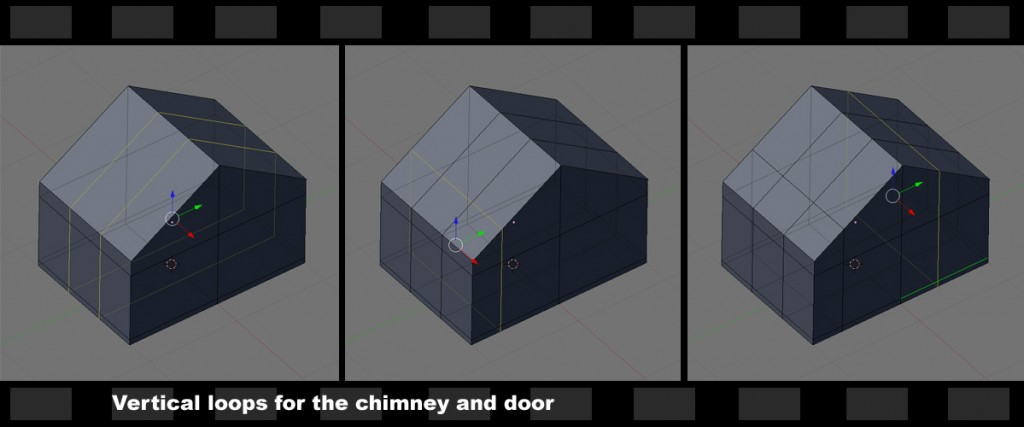
Let’s now make two more vertical loops on the side, for the chimney, and one more through the front. Then make one more vertical loop through the front to define the door.
EXTRUDE
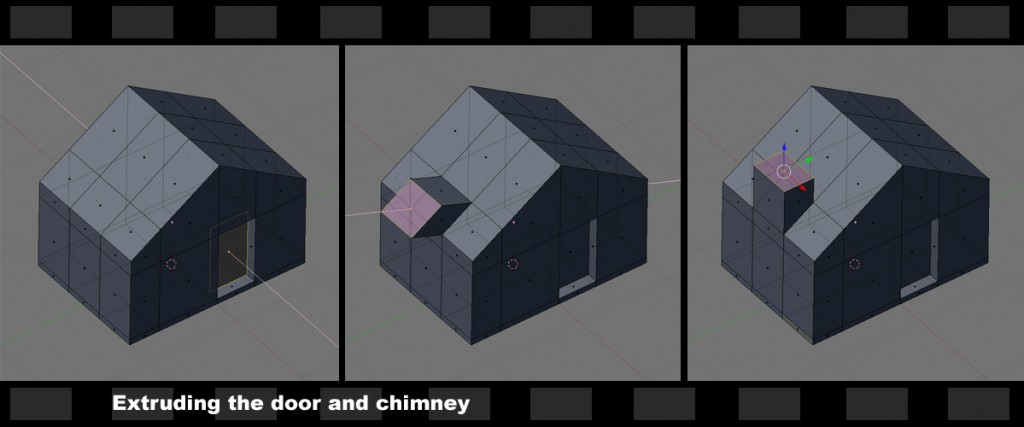
Extrusion is a tool common to most modelling applications and it works very nice in Blender. You can extrude vertices, edges or faces. We’ll switch to Face editing mode (Ctrl+Tab -> Faces) and select the door rectangle. Press E for extrude and push the rectangle a bit to the inside of the model. By default the extrusion will work along the normal of the face. Press Enter to finish the extrusion.
Now select the rectangle for the chimney. Press E and the extrusion starts, but not in the direction we need so press z to have a vertical chimney. To align the top of the chimney in a horizontal plane use S (scale) as before and enter z followed by zero.
Now you can exit edit mode by pressing Tab and admire the model in it’s complexity 🙂
THE ADD MENU
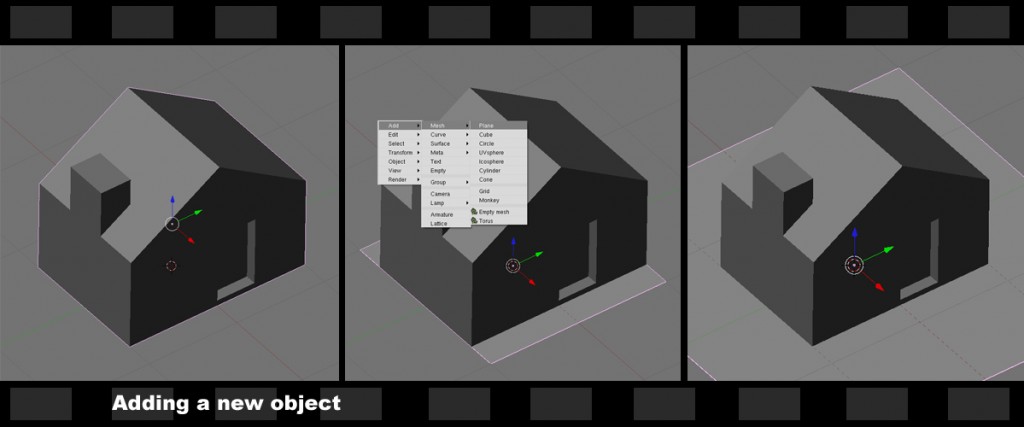
Let’s add a plane for the ground: Spacebar brings up the menu we need. Select Add->Mesh->Plane. This will add a 2×2 plane centered on the 3D Cursor which should be at 0,0,0 location. The plane is right under our house but a little small, scale it a bit.
We’re done modelling and this is a modelling beginners tutorial but you will like to press the render button and see what happens. I’m afraid nothing too amazing until we get to the materials and lights beginners tutorial 😉 but still, the default scene included one camera and light (with raytraced shadow) pointing at the center, so if you press F12, Blender will render the view from the active camera: the render window pops up and you get a simple gray little render.
I hope you found this useful and I’m waiting for your feedback!
-
fazil
-
Oana
-
Lace Williamson
-
Casper
-
nba locker codes
-
nba 2k15 vc hack
-
PatoSagogma
