Dec
05

Twirly sphere modelling

By

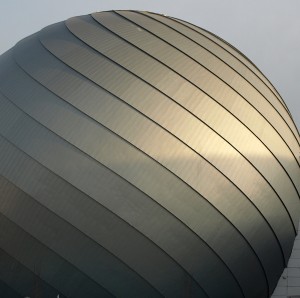
There’s a new mall in town and it came with a big swirly-sphere-something that inspired and challenged my Blender budding modelling skills. It’s a spherical structure completely clad in metal sheet, in a spiraled pattern and with an overlapping detail, as you can see in this photograph:

Photograph of the cinema sphere

Photograph of the cinema sphere

This is not exactly the usual modelling stuff I encounter in my architectural 3d work. Usually it’s straight walls, not anything fun like aliens and robots – so let’s at least try a nice twirly sphere.

Especially as it can be done very quickly πŸ˜‰

I started with a UV sphere. After a couple of tests 26 seemed a good number of divisions to match the photo. For the overlapping detail of the slices Idoubled the number, entering 52 segments. I also entered 32 rings and radius 14.

In the top view I selected one by one half the meridians using ALT+SHIFT+LMB in edge selection mode: ALT selects one whole meridian and shift adds to the selection.

Selecting alternate meridians

Selecting alternate meridians

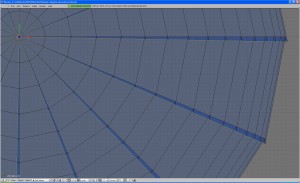
Next I rotated the selected meridians around the sphere z axis and scaled them a bit outwards to get the overlapping detail:

Rotating and scaling the selected edges

Rotating and scaling the selected edges...

...until getting the desired overlapping detail

...until getting the desired overlapping detail

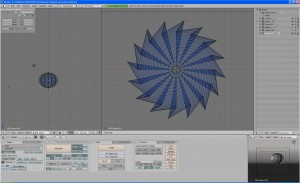
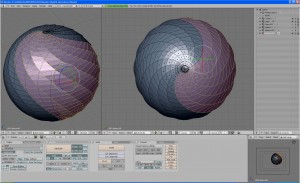
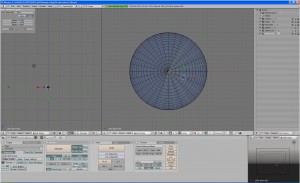
I then changed to vertex selection and picked the top center vertex. In the 3d view menu I turned Proportional Edit Falloff on with smooth falloff and I started rotating my vertex around the central z axis of the sphere. With the middle mouse wheel I increased the proportional edit area to include the whole sphere and rotated until I got a nice swirl.

Rotating the top vertex with Transformation Fallof on

Rotating the top vertex with Proportinal Edit Fallof on

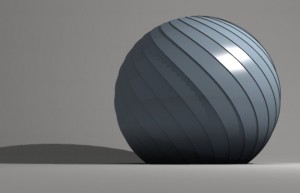
Now I arranged the scene a bit and made a test render.

No smoothing

No smoothing

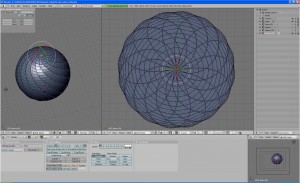
The shape is good but it needs some smoothing. However I only wanted to smooth the surfaces, leaving the edges sharp and clear. I switched to face selection mode and again I used ALT+SHIFT+RMB in the top view, selecting one by one all the spiral slices. To have a better view of what I’m doing I switched to solid mode (Z-key) and turned Occluded Background Geometry on (in the 3dview header, a button with a cube appears next to the face select mode button).

Selecting the faces that need smoothing

Selecting the faces that need smoothing

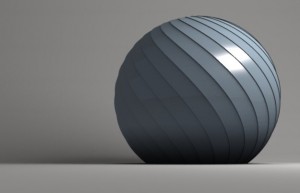
Here is the rendered result:

After smoothing, with sharp raytraced shadows

After smoothing, with sharp raytraced shadows

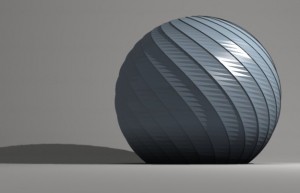
The sphere looks smooth and nice but the sharp raytraced shadows has a jagged edge on the surface, due to a bit of distortion in the geometry. I could adjust this by restarting work with an increased number of rings on the initial sphere but as I don’t like redoing all I opt for a quick fix, that is a soft shadow on my lamp. The jagged edge disappears and the sphere is smooth and nicely lit.

Final render with soft raytraced shadow

Final render with soft raytraced shadow

This was my swirly sphere, hope you found this interesting, and if you find a different method for modelling this shape I would be pleased to hear about it!
Categories : Modeling
  • Wow, nice!!

  • Great tutorial, simple and well explained. πŸ˜‰

  • Here are my results: http://img44.imageshack.us/img44/8648/twirlyball.jpg
    (sorry for copy/past thing)

    Nice tutorial you have here!

  • Asher

    Maybe another method could be (not sure haven’t tried tho) to build those curves edges out of a basic maybe 24 vert circle. Extrude to get the edge depth, then Spin Dup? Again, not sure but it might be quicker and neater once you get teh original curve shape your looking for. Loved yours though, looks great on mine tho i tried with less verts πŸ˜€

  • marc

    Neat and elegant. I like it.
    And cherry on the cake, it’s not a video tutorial!
    That’s great for those, like me, who lives in china and do not have access to youtube,vimeo, ect…!

  • Hi,

    Well explained and nice shape, indeed. I’m glad too to not see yet another video tutorial… I think that videotutos are just overrated.
    Thanks for sharing,
    Raimon

  • Cool! That’s AFI Center in Bucharest, great mall …

  • Oana

    Thank you for the comments, it’s nice to know people tried the tutorial, I’ll be motivated to write some more πŸ™‚
    @marc and Raimon – I was just wondering whether people are still interested in tutorials other than video! πŸ™‚
    @asher – I’ll give your ideea a try, I didn’t try Spin dup yet!

  • Brittany

    I’m pretty new at blender. So sometimes there is something in a tutorial that may be assumed by the author and others that are more familiar with blender than I am, that I just don’t pick up. I’m in the rotate manipulator mode. I’ve got that red/blue/green arc, I’ve selected the top central vertice, I’ve selected the rotate z, but nothing is happening. I’m moving my mouse but nothing changes. What am I doing wrong? Anybody?

  • Can I translate your tutorial to Brazilian Portuguese ?
    People here in Brazil are asking me to translate and Publish…
    Credits to Oana…

  • Oana

    Sure it’s ok! When it’s published I would like to put a link to it on my blog too πŸ™‚

  • Oana

    to Brittany: I’m not sure but maybe the Proportional Edit Falloff is not set right? The vertex you selected will stay in place but the rest will rotate around it. You don’t necessarily have to use the manipulators, just look at the sphere from above (numpad key 7) and press R key. Of course you can use the manipulators if you prefer. Hope this helped.

  • Oana

    to Sebastian Bratu: yes, it’s afi palace πŸ™‚ It’s ok – but a bit overcrowded now…

  • Here’s my attempt
    http://dl.dropbox.com/u/1699204/random%20twirly%20render.png

    Not my best, but messed with random light settings…

  • Brittany

    I feel so stupid! Why am I the only one that this isn’t working for? I did everything you said. First I went to Mesh>Proportional Falloff>Smooth. Then I used the button that looks like a little orange ring and set that to “On” and Smooth. I selected the top vertice, pressed “R” and nothing happens when I move my mouse around. I pressed R>Z because you said “along the z axis of the sphere.” Still nothing. Another thing that is troubling me, and maybe it’ll help figure out what I’m missing, is that in your transform properties window, your value for vertex z = 1. When mine is equal to one, I have a big cone shaped hole going down the center of the sphere! Lastly, I tried selecting the top vertice, selecting “R” and then entering a value for the ammount of rotation. Nothing. I’m really about to give up on this all together, but I really want to use this swirly ball.

  • Oana

    Brittany: from what you describe I think you missed the part where you set the radius for the Proportional Fallof tool. While you rotate, move the mouse wheel and you will see a white circle that changes size. That shows the radius over which the Fallof works. If the radius is too small and it won’t include more than the selected vertex nothing will happen. If you don’t have a wheel on your mouse “page up” and “page down” keys will do the trick.
    The transform properties shows the coordinates of the selected vertex so what you did was to move the vertex on the z axis.
    Let me know if it works πŸ˜‰

    Daworm: it’s so thrilling for me to see people are finding the tutorial useful πŸ™‚

  • Brittany

    Wow! I finally got it(yesterday). I don’t have a website to show it to you on at the moment. But I think that I like the outcome. My overlap isn’t as much as I would like it to be, I can work on that. But the swirl came out nicely. Thank you for the great tutorial!

  • Oana

    @Brittany: I’m glad it worked πŸ™‚

  • Pingback: Woodcrafting Art()

  • Very nice tips, here!! This can be used for several purposes. Thank you!!