…Back to Nature (academy)
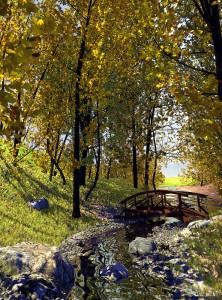
ByLast night I managed to submit an image to the Nature Academy end-of-season contest. I didn’t go through all the tutorials yet as I didn’t have much time lately, but I really wanted to participate in this!
I am a bit sad I didn’t have a couple more days to adjust the small detail and make better finishing touches. That is… I should have decided a couple of days earlier on my subject! I’m afraid it won’t stand closer scrutiny from the guru. And if I win the prize and then he asks for my .blend file, after one look at my compositor work he will take the prize back 😛 But I like it too much and I am so amazed I could do this in Blender in relatively short time! so I will proudly put it in the gallery and.. maybe make a print for my wall 🙂
I have managed to make the trees in Sapling after all. Maybe I get to write a more detailed post about this, but there is a very good tutorial about it already on Blendernerd. The tutorial covers all the process but I just want to add – the magical settings panel for adjusting your tree exists just as long as you don’t try to do something else.. like “undo” for instance. If you accidentally do, either the tree will be “complete” with no chance of editing it again so if that was not it, you will have to start from the last saved preset. Or in the “undo” mishap, everything just vanishes. This is a Blender “feature” found in spheres and other new objects, but you get a little bit sadder when you have tweaked for half an hour the perfect tree shape. It also moves a bit slow when you get more detail in, but that is to be expected – in Arbaro you can’t see a proper preview so I’d rather see a full preview and have to wait a bit. So overall it is a very promising addon and the integration in Blender is great!
The colour of the leaves comes from a forest photo from which I cut a bit of foliage, then I edited and made it seamless in Gimp. The map is applied with generated mapping to the whole tree. This was my own tricky recipe. Besides translucency, the leaves also have some emit on the colored texture to enhance the light effect.
I spent a lot of precious time on the bridge, UV unwrapping it for a wood texture – then I added so much dirt that no wood texture can be seen… and more detail was lost in the shadows and contrast editing.
The nice large rocks are just dropped in from the ready made collection available in the course.
I made the river water following an idea of my own but the reflections are not too realistic.
In the compositor I added a bit of DOF, glow, contrast and sharpness.
There is a new great improvement on the Nature Academy website – live chat! I discovered it yesterday and was surprised to find several people there, exchanging information and just having a friendly talk. It kept me awake until I made the submission 🙂
The contest results will be revealed on November 10th.
-
greg p
-
Oana
-
greg p
-
Weeranut
-
Kai


